I’m really excited to share this toddler house bed DIY with you guys… I have been working on this project for a really long time!
And by working, I mean dreaming.
You see it started like it always does, by a photo on Pinterest. Then the obsession takes root in my soul and I just must let it be realized. 😀
Its the trendy yet wonderfully magical toddler house bed! I am hooked. I love it, kids love it, we all love it.
My daughters room is not very big, but it has a very large bed. It’s a queen bed in a tiny bedroom. It will be good for later but for now it just seems looming…

How we ended up in that mattress situation is a long story, but the other problem is, she has never slept in it! We still are cosleeping as a family of four on our king mattress in the main bedroom.
As my two toddlers get older I have been starting to get inklings of the “it’s time they move to their own room’ feeling that most people usually seem to get a lot earlier than I do… I don’t know how I came aboard this train but here I am, unlikely to ever get off 😂
Well anyways I have been wanting to make the kids bedroom really special and beautiful for the incoming sleep transition so I kept those Pinterest inspirations in my mind and thought about how I could transform them into a queen bed sized reality without being too cumbersome. We do have a window over part of the bed and I also wanted to work around that.
In addition, I really wanted to make this house bed diy style instead of purchasing a bed because I like to save a buck.
The wood for this project and a box of Kreg screws only costed us $97!
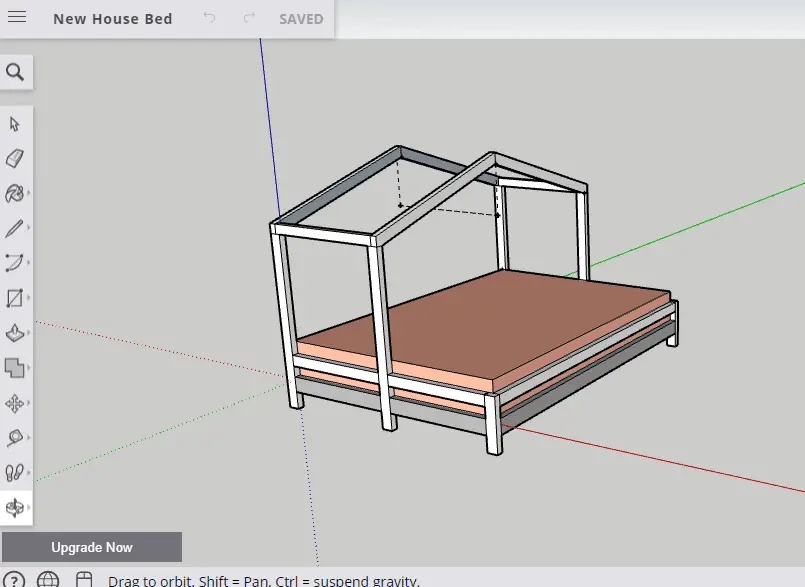
So I started sketching and sketch-up-ing and came up with what I call the “Queen House Daybed”. It is still a house bed, but only over HALF of the mattress (along the long side) like a day bed. It fits right in the corner of the bedroom and doesn’t block the window.

I have to admit that I just love this design for so many reasons:
- It is really fun for toddlers and kids but I would have also loved it as a tween and teen. I think it will last for a while! (Unless we need bunks…)
- It provides a convenient monkey bar for my toddler to swing from as much as she likes! (Instead of the fridge handle or doorknobs!)
- If she throws a blanket on top, she has an instant fort. (She is always wanting to make tents and forts)
- You can wrap lights or pretty strings around it.
I designed the house bed on Sketchup and let it sit there for quite a while to make sure it was what I wanted.


After a few months, when I felt like we could finally sneak the project in (and when wood prices finally dropped back down), I ordered some wood from Home depot and sent my kind husband to pick it up.
(Piece of advice #1 I’d like to note here: don’t do that unless you are willing to use lame pieces of wood. I should have gone inside and picked my lumber myself, they gave me a lot of crappy pieces, including ones that still had a ton of bark on them! Wth home depot.)
When the wood arrived I laid it all out on the driveway and had to sand it down pretty well.

I used 60 grit paper at first, then went lighter until it was smooth enough to work with. I should have spent even more time sanding it, it is still pretty rough compared to what it should be now in it’s finished state.

We then started marking everything and making all the cuts we could at this point. We cut it all, then drilled it all, then assembled.
The cut, drill, assemble order is the most efficient way to work and it saved us a lot of time here.

After cutting everything we called it a night and watched a movie and ate cowboy quesadillas and I had a nightmare about selling our house.
The next morning was drilling time.
This is the first time we have ever ventured into pocket hole wood working. Gasp! It went great!!
The pocket hole jig we have is from Harbor Freight, it is so awesome for such a great price! It is really easy to use and pretty fun too. We mounted it to a piece of scrap wood to keep it portable yet stable. I watched several youtube videos of other people reviewing this jig to see how it worked.
The only inconvenience we had is that the drill bit depth collar was missing its locking screw, so we couldn’t use the depth collar at all. We ended up just marking the depth on the bit with some tape and only drilling to that point.

Not ideal, but it worked fine. I guess I will have to call and get a replacement screw for next time.
After we cut and drilled everything we could, we started assembling the side rails.
The side rails are made up of one 2×4, one 2×3, and two legs made from 2x3s.
The bottom 2×4 rail is the height off the ground of another 2×4, and the 2×3 is the height up from that the height of another 2×3. I hope that makes sense. 🙂
So to screw it together we just rested the bottom 2×4 on another 2×4, then rested the top 2×3 on another 2×3. It was super easy to space them this way and it looks really good.

The side rails were made the same, however they were split in half to allow one of the house’s legs to be in the middle.
At this point we took a break and I put the little down for a nap. We ate lunch.
We brought everything inside and assembled it. I had to turn on some white noise to we didn’t wake the napping baby 🙂 #Momlife.
Remember those bark-y pieces of wood I told you about? We strategically flipped and placed them so that you can’t see them! They are all facing walls so you can’t even tell unless I pull away the mattress and point it out. Good enough for me.

It was starting to look really great! And it barely perfectly fit in the space in the corner of the room and still allowed the door to barely open all the way. Nice!
Now that the main bed frame was put together I measured it once more and then got on my computer again to figure out the angles we needed to cut for the roof pieces.

They needed to have 65 degree angeled cuts on both ends. We didn’t have a protractor so I printed one on a piece of paper. 🙂 I love technology.

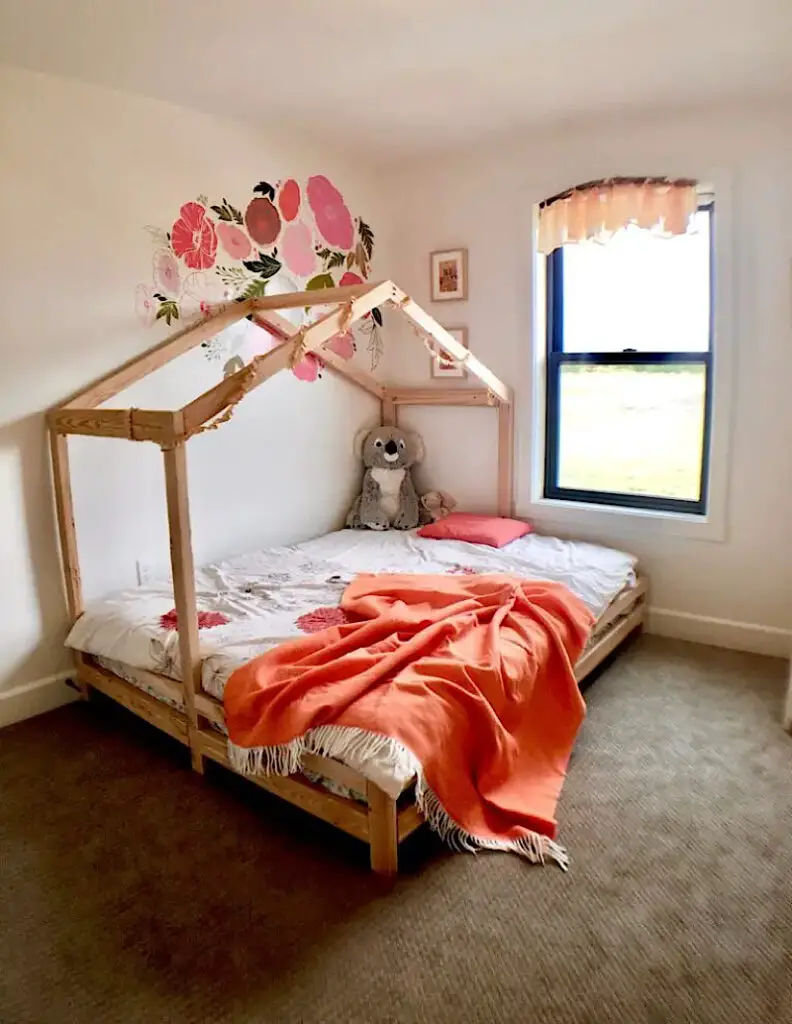
Assembling the roof made it so real! We screwed each side of the roof together outside then brought them in to attach it.


After slapping on the slats on the bottom it was done!

Hauling the mattress onto the bed was tricky because the sheet kept falling off. I need to invent a better bed sheet with zippers so I never have to move this mattress. When I do, you can have a discount.
In conclusion, We only lost hope a few times during this hours long house bed DIY project, and I only shed like a few tears. 😂
My husband only said “working on the weekends is not relaxing” like three times, and the kids held out for the long haul.

I’ll call that a win! Plus, this was our first pocket hole project this big, we are not practiced!
It isn’t perfect. Not all the rails are perfectly flush or straight. Don’t tell a professional woodworker. They would probably cry if they saw this bed.

Come to think of it, my own brother is a professional wood worker and when I showed him a photo he said “cool” so I think that about sums it up!
I now just need to fill the pocket holes and I may end up painting or distressing the bed. I like the raw pine color a LOT, but painting it and distressing it will obviously help hide our few issues….
We are owning the industrial chic look for now.
The house bed diy was very well received and instantly used to build a giant tent fort and we all snuggled there for a while. Now I’m writing this post while my husband is outside planting a tree.

What do you think? Did we nail this house bed DIY? Am I living the dream?
(Well, I guess the right question is: is my toddler going to live the dream if she ever as soon as she weans from co sleeping??) 😂
About the room:
- If you want to learn how I made those flowers on the wall read here!
- The artwork is from my nice family member who lived in New York for a time and brought them back to us as gifts!
- The curtain is a large branch that I oiled and tied some fabric to.


You are literally so flipping cool !! I’m glad I found this blog, because it’s everything I love ! DIY, building, sewing, frugal-ness, faith, & motherhood ❤️
Thank you Robyn! That really makes my day!
Thank You! I am so happy you replied. I love your design and am going to try my best to re- create . I would love a complete tutorial, but appreciate what you have shared so far.
All I did was measure the mattress, then design the bed myself on sketchup with all the exact dimensions of the lumber. It’s totally doable! Good luck!
Hi Rachel,
I have searched your post up and down for my shopping list for Home Depot. I’m not sure exactly what to order and what sizes? Do you mind telling me how many? And what size/ kind of wood I need?
Hi Maya! I am still working on the instructions for this DIY! I shared our own how-to process in this post but the complete tutorial and materials list is still in the works. For this bed we used 8 2x3x8’s, 3 2x2x4’s, 4 2x4x8’s, one box of 2.5 inch pocket hole screws, and 12 1x3x8’s for the bed slats.