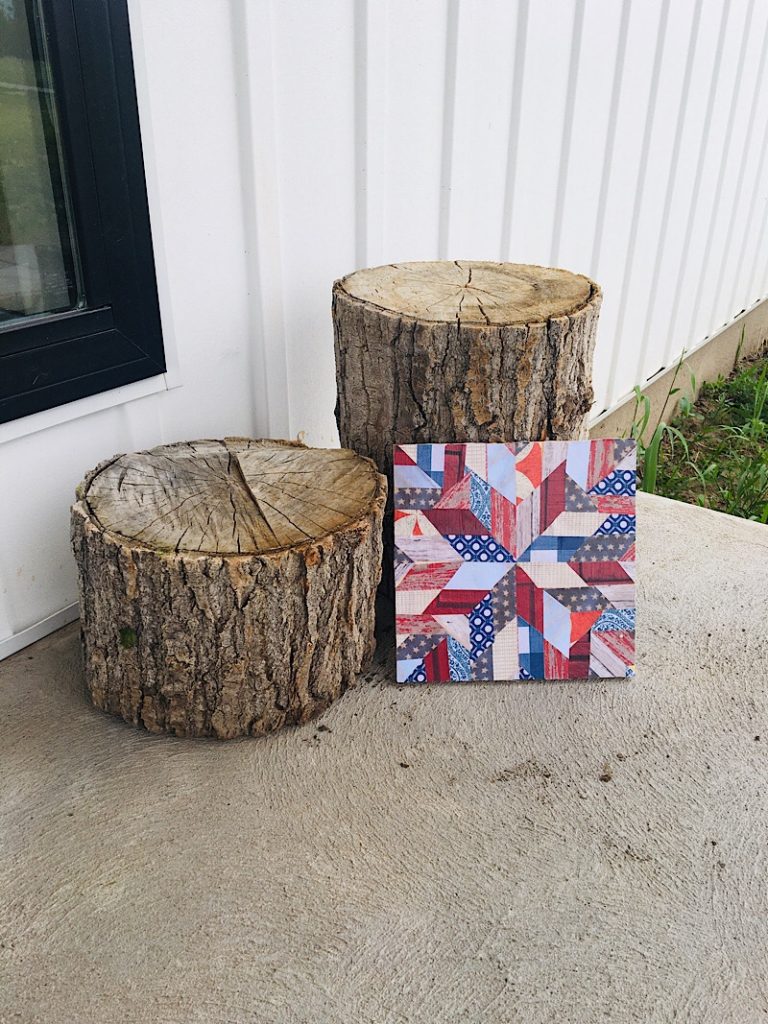
I have seen some seriously cute quilt block barn signs, and I wanted to create my own DIY version: here is how I made this patriotic wood sign!
For the past six months our front porch has been empty and lonely. I really wanted to make it more inviting and since our last house didn’t really have a great front porch, I’ve been hoarding Pinterest ideas just waiting for the day I had a porch bigger than 3×3 feet!
This crafty idea came to me after seeing some gorgeous painted barn quilt block signs. I love the scrappy way quilt blocks look, but I’m not a huge quilter so a wood sign is a great way to capture the same look!
This DIY is SUPER easy, quick, and was free for me since I had all the stuff already laying around!
Here’s what you will need to make this patriotic wood sign!
- Scrap Wood
- Scrapbook paper
- Glue Stick or Mod Podge
- Mod Podge
- Paint brush
Step 1: Cut The Wood into a Square
I didn’t have a huge piece of wood so I made my sign about 9×9 inches, which was fine for this project. You can make your sign any size you want!
(My plywood was about half an inch thick. You could get away with thinner, but I thought this thickness was perfect.)
Step 2: Cut the Scrapbook Paper
I chose to make this a patriotic themed porch decoration for the fourth of July, so I gathered some Red White and Blue paper. I think it would be cute to make matching signs for other holidays!

Gather enough pieces of paper so that you will be able to cover your sign. If you run out, you can always cut more.
To cut the quilt shapes, you first need to cut all the paper into strips.

I cut 1 inch wide strips. If you have a bigger sign, make your strips thicker. You want your pieces to be small enough that you get a good amount of them on the sign to make your design, but not so small that it takes forever to glue them all on. You’ll have to use your judgement here. Alternatively, you can use an 8 pointed star quilt block pattern like this one.
After you have cut the strips, you will cut them into the diamond-y shape. I cut the strips at about a 45 degree angle, then cut them again to make the parallelogram about 3 inches tall. You will need to cut out many of these in every color, as well as cutting the same amount but mirrored.

If you need a pattern, use this printable! (you can scale it to be bigger or smaller for your sign.)


Step 3: Glue ‘Quilt’ pieces to the Wood
Measure and mark the center of your sign, then you are ready to glue!
I used a glue stick to glue the pieces on. I glued them on somewhat randomly, but I loosely tried to make sure that no similar pieces were touching each other. Some of my pieces weren’t cut perfectly so I had to overlap them a little to make sure the pattern stayed symmetrical, that’s okay! Its rustic. ‘;)

I started with the middle and worked outwards. The center star should look like this:


Then you just keep adding pieces on all sides working outwards.

It starts to look really awesome the more you glue on!
Once you get to the edges of your sign, keep gluing the pieces on around the edges and then trim them down to fit once its all dry.


Step 4: Seal the Finished Sign
Once all the glue is dry, get out the mod podge and paint a good layer all over to seal it up!


Then just let it dry, and you have just made a quilty patriotic wood sign!
That’s it! So easy! Now stick it on your counter or porch or wherever and take some pictures!


To decorate my porch, I got two logs out of our huge log pile that is waiting to be cut. I picked a short one and a tall one.


Then I also found an old metal bucket in my garage.

It was painted green which didn’t match the Red White and Blue, so I stripped it with citristrip and wiped off the paint to expose the metal underneath. I added a bow and planted a wild rose bush inside, which we found down by the end of our driveway in the weeds. 😂 My sweet husband…
It’s alive, but the leaves are dead and it needs to be trimmed back.

I also made two little scrappy American flags to stick in the bucket.

A few days later I walked into the grocery store looking for pool noodles for another project, and came out with this red plant since it was on sale for $2! Its a kalanchoe.
I’ve never owned a kalanchoe before! Its very cute, I am going to try to propagate it! Succulents are one of my favorite house plants because they are easy to propagate and care for. If you’ve never tried a succulent, you have to take a look at the Succulent Sprite’s guide to where to buy succulents online.

We also found this awesomely amazing third-hand used bench on Craigslist for $35!! A steal! It’s in great condition and the color is so nice. I was planning on making a bench so I am over the moon!

Here’s how it all came together:

If you try this DIY, leave a comment below, I’d love to see how it turned out!
Feeling Crafty? Check out this cute frame I made to display my girls’ hairbows!