This post contains affiliate links. As an affiliate, I make a commission on qualifying purchases at no extra cost to you. I only recommend what I personally use and love. See Disclaimer for more details.

This project was super easy and my toddler loved to help with the paint.
Since it is a rustic farmhouse-y style project, the paint didn’t need to look perfect so I let her have at it!
If you’re a craft hoarder like me, you may already have all this stuff laying around! I didn’t have to purchase anything so this costed me a whopping $0!
Even if you have to buy a few items, it is a cute inexpensive project that will help you get organized.
Thrift stores are my favorite place to look for frames. I used a frame that was about 12×16 inches large.

For this project you will need:
- An old wood picture frame
- White paint
- Mod podge
- Sand paper (I used 80 grit)
- Ribbon
- A Hot glue gun
- 3M command picture hanging strips
- Some super cute bows to clip on!
Step 1. Paint the frame white.

You can use craft paint or home paint. I used interior wall paint since we have a lot leftover that’s sitting in the garage begging to be used 🙂
The white I used was Sherwin Williams bohemian lace which matches our walls, and is a nice warm white.
Depending on your paint you may have to let it dry then apply another coat or two. Two coats was enough for me.
I didn’t paint the back.

Step 2. Distress the Paint
After its dry, you need to distress it. This is a fun part!
Using rough 80 grit sand paper, sand off some paint around the frame in multiple areas to distress it.

You can fold the sand paper to get into the nooks and crannies.
There’s no right or wrong way to do this, and if you ‘mess up’ you can just paint it again and start over.

Step 3. Remove Staples
If your frame has staples, remove them from the back with some pliers. (Maybe this should’ve been step one. Ha.)

Step 4. Seal the Frame with Mod Podge
Seal the paint with mod podge. I used a nice thick coat of mod podge in a matte finish. Glossy finish would look nice too.

Mod podge is great because it seals the paint so it won’t scratch or flake off the slippery frame.
Step 5. Glue on the Ribbons
After the frame is all dry it is starting to look super cute! Now it’s time to attach ribbons to the back.
I used sheer white organza ribbons like these.

I chose to glue the ribbons to the back of the frame in the little channel where you would normally lay a photo.
This holds the ribbon away from the wall when you hang it up, which makes it a little bit easier to clip on the bows. It also helps protect the wall from scratches.
You need to decide what orientation you want to hang your frame when it’s finished. It’s not extremely important, but if you want your bows to clip up-sides up, the ribbons you glue to the frame need to be oriented a particular way.
- If you want your frame to be portrait orientation, you will need to glue your ribbons parallel to the long sides of the frame so they are vertical when you hang it up.
- If you want the frame to be landscape orientation, you will need to glue the ribbons so they are parallel to the short sides on the frame. (This is how I did it.)

Depending on your frame size and ribbon size, you may need more or less ribbons across the frame. You can also choose to space them out further apart if you have lots of very large bows.
As a minimum I recommend spacing them about 1.5 inches apart and 1.5 inches from each edge.
Another way to do it is to start by gluing one ribbon in the center, and then adding ribbons spaced evenly on each side one at a time. This is an easy way to make it symmetrical.
Apply the glue to the back of the frame, then stick the ribbon on top and hold it in place until it dries.

I used the side of a plastic fork to hold the ribbon on the glue so I wouldn’t burn my finger. Random but it worked!

Pull the ribbon so it is taut but not too right, and glue the other side down as well. Clip the excess.

After you attach each ribbon, there is only one more step!

Step 6. Hang the Frame
I chose to hang my frame up using 3M command strips so I wouldn’t make any holes in my my walls! We use these ALL over the house, they are so handy.

One side of the command strip attaches to the frame, and one side attaches to the wall. Follow the instructions that come with the strips.
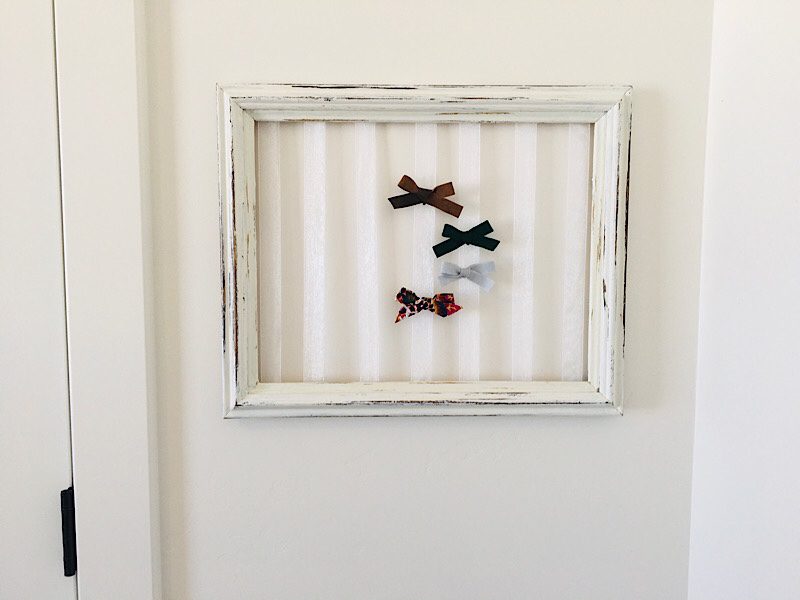
Here’s the finished product!

I love that it doubles as a girly decoration for the girls room at the same time as getting us more organized.


Here it is full of bows:


We get a lot of bows from The Simple Knot Bow Co. on Etsy. Her bows are SO high quality and cute, and you basically can’t beat the price. I may even call them perfect.
I also make a lot of bows out of fabric scraps. Fun fact: that leather bow came from an old leather coat. 😂
I also love making bows out of felt ribbon from The Felt Pod. Their felt ribbon comes in a TON of colors (I think over 80!), and is very thick high quality.
Felt ribbon makes great bows because you don’t have to sew it! Maybe I will post a tutorial some time.


That’s it!
When you make one, I’d love to see how yours turned out! Add a photo to my Pinterest pin and say that you’ve “tried” it!
If you liked this project, be sure to check out these other kid-inspired DIYS: